YOGA

How to Practice Yoga At Home - Creating the Perfect Space

How to Practice Yoga At Home

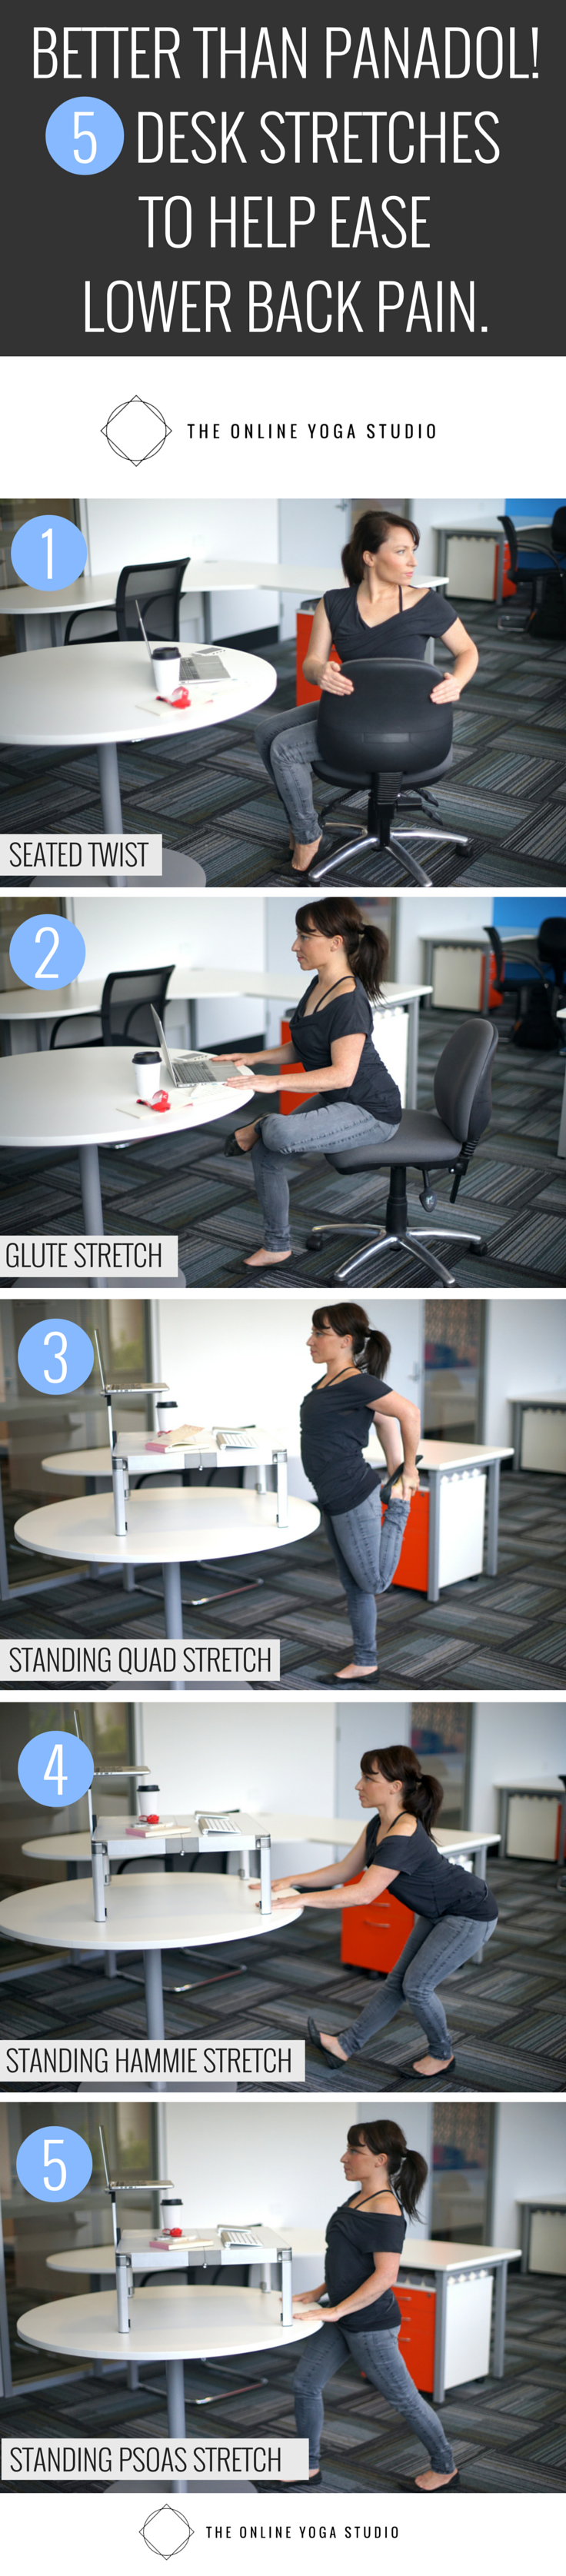
Do you want to practice yoga at home but don't have the perfect space? If so - then read on - we've got the perfect tips to help you get started.

If your house feels more like a kids play zone or thoroughfare for teens and animals, then maybe you can't even IMAGINE what it would be like to practice yoga at home. In this article we cover some simple tips on how to create a Home Practice Space

It’s natural to assume that you need a private space and that everything needs to be perfectly zen and set up ready to go in order for you to start doing yoga at home, so we're going to show you some ways to get started even if things don't seem perfect right now.

Let's start by saying that whilst we LOVE crushing on uncluttered spaces that are clean & minimal. Sometimes you might have to start by embracing the messy realities & stickyness of busy family life or a deadline driven career where you can still give yourself permission to prioritise your home yoga practice over the pile of unfolded washing.

If you’ve got kids, are renovating, just moved, or live in a shared space it might not be practical to have a perfect ‘yoga room’ set up all the time and we want to bust the myth that it should stop you. In fact, our own yoga practice space is not as some would expect – a separate room away from the house – but rather space is smack bang in the middle of the lounge room. 

Where to practice?

Well – firstly you need to find somewhere in your house that you have the space and inspiration to practice. In some cases you’ll have spare room that isn’t used so much (maybe it's the guest room, the unfolded washing room, office or similar). Lucky you - even if you use your spare room for something else - it'll make a great start.

But perhaps you live in a house without a spare room (like us), so in this case you'll need to have a wander around home and think about where the best place to practice will be.

For example, in the middle of the kids room is unlikely to cut it (sun salutation doesn’t mix well with stray pieces of lego) so opt for a corner of your bedroom, the office (face away from your desk and distractions) or somewhere in your house where you have decent natural light.

If you live near mountains, trees, the ocean or can pair it with a tranquil garden view then do that.

In warmer climates – look for somewhere that isn’t too windy or directly in the sun – for us that means we sometimes practice outside on our deck in the warmer months.

Make it work for you & have everything handy.

Once you've chosen a space in your house where you have the room to practice - consider the following:

1. Where can I store my mat and props so they are ready to go.

Our strategy for keeping everything accessible has been to keep all our stuff in a nice basket at the end of our lounge. It's a 1 minute set up to clear the floor if there are any toys lying around, roll our mat out and grab our props. The basket ties in with our decor - so instead of having to hide our equipment - it makes up part of the room without being overwhelming. Avoid storing your mat somewhere where it's a hassle to get to it - otherwise you'll end up creating another barrier to practice.

2. What changes do I need to make to the space in order to be able to practice here?

Consider if you need to de-clutter your room, change the furniture around or make changes to create more natural light or comfortable temperature (do you need heating, cooling etc).

3. What times will work for me and my family to be able to practice here.

Practice times for us usually span the morning or evening or times when our kids are at school. If the kids are around - we usually switch to our bedroom downstairs where we can close the door and let the kids go for it upstairs.

What you need...

Grippy Mat

The only thing you really need for a home practice is a good mat. Personally I find that getting on my mat – is like a little signal to my brain – that it’s time to practice.

How to practice yoga at home

We like Mukti Mats as they are all natural and biodegradable, plus quite grippy.

Other stuff that’s cool for your home yoga practice kit.

Block – If I were to choose 1 prop it would be 2 yoga blocks. Blocks give us options to raise the hips in seated positions, give stability when in poses where we otherwise have trouble reaching the earth and also make great props to help open the chest.

Strap – These are great for those with tight hamstrings. More experienced students will probably find great benefit from using a strap in binding poses where it's otherwise difficult to reach and arm balances for extra support. 

Bolster – Bolsters are great for relaxation and yin style practices. They are especially useful for students with really tight hips to get a bit more height. An alternative is a rolled up blanket.

Foam Roller – We use a foam roller every now to release the quads, thighs and back.

Pressure Point Ball – Like a foam roller, pressure point balls are a great way to release tension - especially in areas of the body that are hard to release (like between the shoulder blades - the deep glutes and lower back).

Next steps:

Sign up to our Press Pause online Yoga Course: 5 Easy Practices for Better Sleep, Focus &  Flexibility. Click here to get started.


BETTER THAN PANADOL! 5 SIMPLE DESK STRETCHES TO HELP EASE LOWER BACK PAIN.

Desk Stretches to Ease Lower Back Pain

If you've ever found yourself with lower back pain at work, you might be surprised to know that adding some simple desk yoga stretches into your daily routine could be better than panadol!

Various studies have looked at using yoga as a way to effectively treat & manage lower back pain - a condition that affects up to 80% of adults at some stage. And although you're probably dying to get to a yoga class - for some reason it's just not happening. Enter 'desk yoga'.

Picture yourself at your desk with a looming deadline - you've been staring at the screen for hours and aside from dreaming that you'd much rather be binging on netflix - that just ain't gonna happen. What IS happening is your neck and shoulders feel tense and your hips and lower back are starting to ache & feel locked up.

You've tried strategies like taking a coffee break (hey caffeine fixes everything right?),  walking around and perhaps you've even trialled standing up at work to ease the pain.

Yoga has been on your 'to-do' list for like - ever - but you have a hard time getting to a class. You're probably juggling some other kind of training, a family, study, or just the other things you love in life like going for a surf, or a run.

You KNOW you NEED to stretch, but just seem to find the time to make it happen.

Locked up glutes and tight hamstrings usually go hand in hand with lower back pain and if you're spending your spare time before or after work running, doing cross-fit, or working out then you're probably making matters worse.

So - in this post we wanted to share our top 5 simple desk stretches that can help ease lower back pain. Think of these as a go to for the days you have that deadline but can't make it to class.

DESK STRETCHES FOR LOWER BACK PAIN

5 SIMPLE DESK STRETCHES TO EASE LOWER BACK PAIN

1. Seated Twist

This one is SO EASY it is just ridiculous that we don't really do it more right! Turn side on to your chair and use the back to hold as you twist.

If you have lower back issues - take care to engage your belly button (suck in your belly), and lengthen before twisting.

2. Sitting Glute Stretch

Face your desk and bring one ankle up to your opposite knee. Flex the foot that is lifted. As you lean forward think of leading with your chest. Take care to maintain the natural curve in your lower back (so stick your booty out - don't tuck under).

3. Standing Quad Stretch

Standing on two feet, bring one leg behind you and hold with 1 or both hands (both hands will mean you also get great stretch through the upper chest).

4. Standing Hammie Stretch

Place one leg forward, one leg back. Bend your back leg as you stick your butt back. Think of lengthening your tailbone toward the floor.

5. Standing Psoas Stretch

Stand one foot forward and one foot about a meter back. Bend your front leg and press your hips toward your desk - think of tucking your tailbone under and drawing your belly button in.

OTHER STRATEGIES TO HELP PREVENT LOWER BACK PAIN

Prevention is always better than cure! Some simple strategies that you can adopt are:

1. Trial using a stand up desk such as the Zest Desk (the world's first portable stand up desk). Awesome for people who swap between work and home and want the option of standing.

2. Get a daily dose of exercise including core strengthening work.

3. Take regular breaks from sitting (we were made to move - not sit still for hours on end).

4. Try our desk yoga sequence as featured here. 

WHAT TO DO NOW

1. We know that tight hips and hamstrings often go hand in hand with lower back pain. So head over to our

2. Leave us a comment below and let us know what kind of sequence you'd like us to share with you next.


7 Simple Yoga Stretches to Tame Tight Hamstrings

stretch tight hamstrings

IF YOU'VE GOT TIGHT HAMMIES  - YOU'RE IN THE RIGHT PLACE!

As a yoga studio owner, I wish I had a dollar for every time someone told me they had tight hamstrings and it might surprise you to know that hamstring flexibility is something that I struggle to maintain.

Give me a handstands (so much fun!) and backbends (so energising) over painful hamstring stretches any day!  I put on muscle mass easily and do well with strength based poses, but maintaining flexibility is not something that comes easily at all. Even coming from a dance background - my hammies are very stubborn and it takes a lot of work to keep them feeling stretched out. So believe me when I say I KNOW!

In this blog post with the help of my partner (and anatomy nerd) Exercise Physiologist, Russ Young,  we're going to show you 7 Simple Yoga Stretches to Tame Tight Hamstrings.  You can either follow along with the pictures (pin it if you're on pinterest to come back to later) or if you're really serious, then I recommend you join our simple online course to get you started with a home practice "Press Pause - 5 Easy Practices for Better Sleep, Focus & Flexibility".

LET'S LOOK AT THE ANATOMY OF THE HAMSTRINGS

YOGA FOR TIGHT HAMSTRINGS

The Hamstrings consist of a group of 3 muscles at the back of the thigh.

Biceps Femoris (located at the back of the leg on the outside)

Semitendinosus (located at the back on the leg on the inside)

Semimembranosus (located at the back of the leg on the inside)

WHAT DO THE HAMSTRINGS DO?

The hamstrings are responsible for flexion at the knee joint (bending the knee) and extension of the thigh (moving the upper thigh backwards). 

The hamstrings also can contribute to the range of motion possible regarding the anterior and posterior tilt of the pelvis.

When the hamstrings are very tight, there is often a tendency to tuck the tailbone too much leading to a reduction or removal in the natural curve of your lower back.

DO YOU HAVE TIGHT HAMSTRINGS?

You can quickly test your hamstring flexibility by standing up with your feet hip width apart & folding forward to touch your shins or toes.

Stand side on to a mirror. As you fold forward, try to flatten your lower back out (by sticking your butt back and lifting your tailbone).

If your posture is really rounded in the lower back and you are unable to reach below the shins by keeping a flat back then chances are your hamstrings are tight.

WHY ARE TIGHT HAMSTRINGS A PROBLEM?

Tight hamstrings can lead to a decrease in the natural lumber curve of the spine.

Over time, this can cause pressure on the discs in your lower back which may lead to subluxation or a ‘bulging disc’.

In this blog post we’ll be sharing strategies from our experience from a combined 30+ years in yoga, exercise physiology & teaching beginners.

TYPES OF HAMSTRING PAIN & TIGHTNESS...

Because the hamstrings are relatively long it is possible to experience different types of tightness or tenderness in various parts of the muscle. Knowing what kind of tightness or tenderness you have is crucial as sometimes what you think is tightness might actually be a sign of injury and needs a different approach (rest and strengthening vs stretching).

GENERAL TIGHTNESS

If your hamstrings are tight in the belly of the muscle, or lower down the leg and it eases off as you breathe and hold the stretch, this usually indicates general tightness.

Beginners, those new to yoga, those who train a lot, and those who have week abdominals will usually experience this kind of hamstring tightness. 


YOGA BUTT + HAMSTRING STRAIN

If you have any of the following symptoms - it is possible you have a strain

  • There is acute pain up and underneath your butt cheek at the sitting bone (ischial tuberosity)
  • Stretching feels more painful as you deepen the stretch and when you lift your tailbone
  • You can pinpoint a small area up under the butt cheek where there is pain
  • Your butt or upper inner thigh continues to hurt or ache AFTER the stretch
  • The pain is getting progressively worse when you stretch
  • There is pain when you sit for long periods of time

This type of injury can be common in those who have been practicing yoga for a while, or started rigorously after a long break and is indicative of an injury at the origin of the hamstring where it joins the pelvis.

This type of injury most commonly happens when there is a focus on a lot of forward bends without sufficient strengthening or warm up (eg: ashtanga yoga students often suffer from this type of injury). This is known as ‘yoga butt’ and definitely not a fun injury to deal with. It can also sometimes feel like you need to stretch it out - but you’ll notice that after stretching it continues to ache and eventually gets more and more painful.

If you suspect you have a strain, it is crucial to ease off all forward bends and seek a diagnosis and treatment which will usually involve rest and strength work.

7 SIMPLE STRETCHES TO TAME TIGHT HAMSTRINGS

  • Warm up first with a few sun salutations or if you are completely new to yoga - you can even do these stretches after a 5-10min walk.
  • Hold each pose for 5-15 breaths focusing on deepening the posture as you exhale.
  • Try to drag the heel of your front leg back as you stretch - this will help activate the muscle.
  • Remember to work within your body's comfortable limits - never straining.
  • The first pose is a strengthening pose for the upper hamstrings. The subsequent postures are designed to help improve hamstring flexibility.

1. Bridge Preparation (Setu Bandhasana)

2. Standing Forward Bend with Blocks (Uttanasana)

3. Kneeling Hamstring Lunge

4. Triangle Pose (Trikonasana)

5. Head to Knee Pose (Janu Sirsasana)

6. Sitting Forward Bend (Paschimottanasana)

7. Supine Leg Extension (Supta Uttita Hasta Padangustasana)

SHARE THE LOVE!

If you like this post or know someone who trains a lot that would benefit from this sequence we love it if you can use the social links below to share the love (we'll be sending some good karma your way).

NOW IT'S YOUR TURN - LEAVE US A COMMENT!

Now over to you....

We'd love you to leave us a comment below and let us know what your tight spots are? Hamstrings? Shoulders? Neck? Somewhere different?

What poses are you working on this year to overcome those tight spots?